
Running Unbound as a Recursive DNS Resolver in Your Homelab
When you use Cloudflare's 1.1.1.1 or Google's 8.8.8.8 as your DNS resolver, you are sending every domain lookup your household makes to a third party. They see every website you visit, every API your smart home calls, every service your phone checks in the background. Even if you trust Cloudflare's privacy policy today, you are building a dependency on their continued goodwill.
Photo by Kammerin Hunt on Unsplash
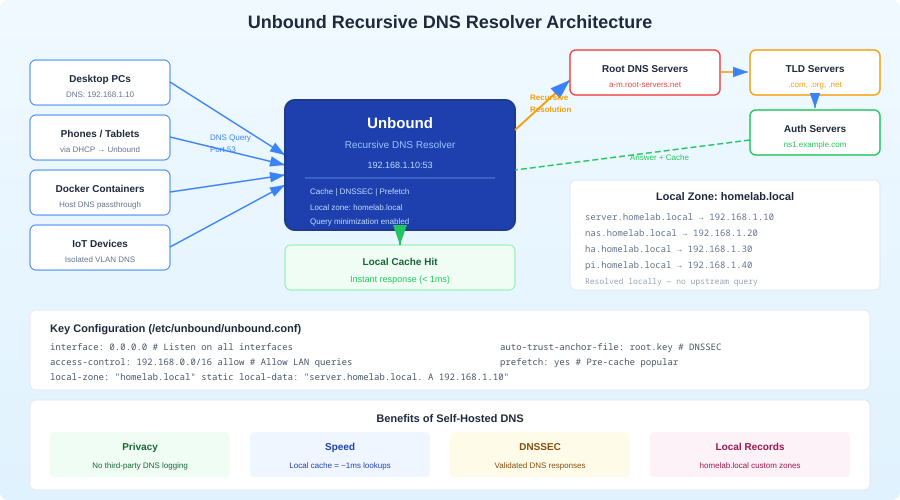
A recursive DNS resolver cuts out the middleman. Instead of asking Cloudflare "What is the IP for example.com?", your server walks the DNS hierarchy itself — starting at the root servers, then the .com nameservers, then example.com's authoritative nameservers. No single third party sees the full picture of your browsing. Unbound is the standard tool for this: lightweight, secure, well-maintained, and purpose-built for recursive resolution.
Why Run Your Own Recursive Resolver
There are three practical reasons to run Unbound instead of forwarding to a public resolver.
Privacy: A forwarding resolver like Pi-hole still sends your queries upstream to whoever you configured (Cloudflare, Google, Quad9). A recursive resolver talks directly to authoritative nameservers. No single entity sees your full query pattern. The root servers see that you asked about ".com" but not the full domain. The .com TLD servers see that you asked about "example.com" but not the subdomain. Only example.com's nameservers see the exact query — and they would see it regardless.
Control: You control the entire resolution chain. No DNS-level filtering or redirection by your ISP. No dependency on a third party's uptime. If Cloudflare's resolver has an outage (as it has several times), your DNS keeps working because it goes directly to authoritative servers.
DNSSEC validation: Unbound validates DNSSEC signatures at every step of the resolution chain. This protects against DNS spoofing attacks — someone injecting false DNS responses to redirect you to malicious servers. Most public resolvers do DNSSEC validation too, but when you run your own, you verify the chain of trust yourself rather than trusting someone else's validation.
The trade-off is latency. A recursive lookup that walks the full DNS hierarchy takes 50-200ms for a cold query. Cloudflare resolves the same query in 10-20ms because they have massive caches. However, Unbound caches aggressively, so after the first lookup, subsequent queries for the same domain resolve in under 1ms from local cache. In practice, the difference is imperceptible for normal browsing.
Unbound vs Pi-hole: Complementary, Not Competing
This is a common point of confusion. Pi-hole and Unbound solve different problems and work best together.
Pi-hole / AdGuard Home: DNS sinkhole that blocks queries to advertising and tracking domains. It receives a DNS query, checks it against blocklists, and either blocks it or forwards it upstream. Pi-hole does not resolve queries itself — it needs an upstream resolver.
Unbound: Recursive DNS resolver that resolves queries by walking the DNS hierarchy. It does not block anything — it just answers "What is the IP for this domain?" accurately.
The ideal homelab DNS stack:
Client → Pi-hole (ad blocking) → Unbound (recursive resolution) → Root/TLD/Auth servers
Pi-hole handles blocking. Unbound handles resolution. Your queries never touch a third-party resolver.
Docker Setup
Here is a Docker Compose configuration for Unbound. If you are running Pi-hole alongside it, both services are included:
# docker-compose.yml
services:
  unbound:
    container_name: unbound
    image: mvance/unbound:latest
    restart: unless-stopped
    ports:
      - "5335:53/tcp"
      - "5335:53/udp"
    volumes:
      - ./unbound/unbound.conf:/opt/unbound/etc/unbound/unbound.conf:ro
      - ./unbound/root.hints:/opt/unbound/etc/unbound/root.hints:ro
    healthcheck:
      test: ["CMD", "drill", "@127.0.0.1", "cloudflare.com"]
      interval: 30s
      timeout: 10s
      retries: 3

  pihole:
    container_name: pihole
    image: pihole/pihole:latest
    restart: unless-stopped
    ports:
      - "53:53/tcp"
      - "53:53/udp"
      - "8080:80/tcp"
    environment:
      TZ: "America/Los_Angeles"
      WEBPASSWORD: "${PIHOLE_PASSWORD}"
      PIHOLE_DNS_: "unbound#53"  # Use Unbound as upstream
    volumes:
      - ./pihole/etc-pihole:/etc/pihole
      - ./pihole/etc-dnsmasq.d:/etc/dnsmasq.d
    depends_on:
      unbound:
        condition: service_healthy
Note that Unbound listens on port 5335 on the host (mapped to port 53 inside the container), while Pi-hole takes the standard port 53. Pi-hole forwards to Unbound internally using the Docker service name unbound on port 53.
Root Hints File
Unbound needs to know the IP addresses of the DNS root servers to begin recursive resolution. Download the current root hints:
curl -o unbound/root.hints https://www.internic.net/domain/named.root
Update this file every 6 months. The root server addresses rarely change, but keeping them current is good practice. A cron job handles this:
# Update root hints monthly
0 0 1 * * curl -so /path/to/unbound/root.hints https://www.internic.net/domain/named.root && docker restart unbound
Want more networking guides? Get guides like this in your inbox — HomeLab Starter delivers one free deep-dive every week.
Unbound Configuration
Here is a production-ready Unbound configuration optimized for homelab use:
# unbound/unbound.conf
server:
    verbosity: 0
    interface: 0.0.0.0
    port: 53
    do-ip4: yes
    do-ip6: yes
    do-udp: yes
    do-tcp: yes

    # Access control
    access-control: 10.0.0.0/8 allow
    access-control: 172.16.0.0/12 allow
    access-control: 192.168.0.0/16 allow
    access-control: 127.0.0.0/8 allow
    access-control: 0.0.0.0/0 refuse

    # Privacy and security
    hide-identity: yes
    hide-version: yes
    harden-glue: yes
    harden-dnssec-stripped: yes
    harden-referral-path: yes
    harden-algo-downgrade: yes
    use-caps-for-id: yes

    # DNSSEC
    auto-trust-anchor-file: "/opt/unbound/etc/unbound/root.key"
    val-clean-additional: yes

    # Performance tuning
    num-threads: 2
    msg-cache-slabs: 4
    rrset-cache-slabs: 4
    infra-cache-slabs: 4
    key-cache-slabs: 4
    msg-cache-size: 64m
    rrset-cache-size: 128m
    key-cache-size: 32m
    neg-cache-size: 4m

    # Prefetching
    prefetch: yes
    prefetch-key: yes
    minimal-responses: yes
    serve-expired: yes
    serve-expired-ttl: 86400

    # Logging (minimal for production)
    logfile: ""
    log-queries: no
    log-replies: no
    log-servfail: yes

    # Root hints
    root-hints: "/opt/unbound/etc/unbound/root.hints"

    # Private address ranges (prevent DNS rebinding attacks)
    private-address: 10.0.0.0/8
    private-address: 172.16.0.0/12
    private-address: 192.168.0.0/16
    private-address: 169.254.0.0/16
    private-address: fd00::/8
    private-address: fe80::/10
Key Configuration Choices Explained
prefetch: yes: When a cached entry is about to expire, Unbound fetches a fresh copy in the background before it expires. This means popular domains are always served from cache with near-zero latency, at the cost of occasional background queries.
serve-expired: yes: If a cached entry has expired and the upstream authoritative servers are unreachable, Unbound serves the stale cached entry instead of returning SERVFAIL. This improves resilience — a brief upstream outage does not break DNS for your network.
use-caps-for-id: yes: Randomizes the capitalization of query names (DNS is case-insensitive). This makes DNS spoofing attacks significantly harder by adding entropy to queries that an attacker would need to match.
harden-dnssec-stripped: yes: Refuses to return results for DNSSEC-signed domains where the signature is missing or invalid. Without this, a man-in-the-middle could strip DNSSEC signatures and serve forged responses.
Cache sizes: The rrset-cache-size should be roughly double msg-cache-size. For a homelab serving a household, 128 MB for rrset and 64 MB for msg is generous — most setups will only use a fraction of this. Larger caches mean more domains resolve from memory without touching the network.
Forwarding vs Recursive Mode
Unbound can operate in two modes. Everything above describes recursive mode, which is the primary reason to run Unbound. But forwarding mode has its uses too.
Recursive Mode (Default)
Unbound resolves queries by walking the DNS hierarchy. No third-party resolver is involved.
Your query → Root servers → TLD servers → Authoritative servers → Answer
Pros: Maximum privacy, no third-party dependency. Cons: Slightly higher latency for cold queries.
Forwarding Mode
Unbound forwards queries to an upstream resolver but still performs DNSSEC validation locally.
# Add to unbound.conf for forwarding mode
forward-zone:
    name: "."
    forward-addr: 1.1.1.1@853  # Cloudflare DNS over TLS
    forward-addr: 1.0.0.1@853
    forward-tls-upstream: yes
Pros: Lower latency (public resolvers have huge caches), DNS-over-TLS encrypts queries in transit. Cons: Third party sees your queries again.
Forwarding mode with DNS-over-TLS is useful if your ISP intercepts or logs DNS traffic. In that case, forwarding encrypted queries to Cloudflare is better than having your ISP see plaintext queries to root servers. But if your ISP is not actively hostile, recursive mode is the better choice.
Integration with Pi-hole
If you are already running Pi-hole, switching from a public upstream to Unbound takes one configuration change.
Pi-hole Configuration
In the Pi-hole admin interface:
- Go to Settings > DNS
- Uncheck all upstream DNS servers (Google, Cloudflare, etc.)
- In "Custom DNS servers", add:
unbound#53(if using Docker service name) or127.0.0.1#5335(if Unbound is on the same host) - Uncheck "Use DNSSEC" — Unbound handles DNSSEC validation, and having Pi-hole try to validate as well causes issues
If you are using the Docker Compose setup from above, Pi-hole is already configured to use Unbound via the PIHOLE_DNS_ environment variable.
Integration with AdGuard Home
AdGuard Home uses a similar approach. In AdGuard Home settings:
- Go to Settings > DNS settings
- Under "Upstream DNS servers", replace existing entries with:
127.0.0.1:5335or the Unbound container IP - Remove any Bootstrap DNS servers (AdGuard will use Unbound for everything)
- Enable "DNSSEC" in AdGuard to pass DNSSEC-validated responses to clients
Verifying Your Setup
After deploying Unbound, verify that recursive resolution and DNSSEC are working correctly.
Test Recursive Resolution
# Query Unbound directly
dig @127.0.0.1 -p 5335 example.com

# Check the response flags — look for "ra" (recursion available) and "ad" (authenticated data/DNSSEC)
# ;; flags: qr rd ra ad; QUERY: 1, ANSWER: 1, AUTHORITY: 0, ADDITIONAL: 1
Test DNSSEC Validation
# This should return a valid response with "ad" flag
dig @127.0.0.1 -p 5335 sigok.verteiltesysteme.net

# This should return SERVFAIL (deliberately broken DNSSEC signature)
dig @127.0.0.1 -p 5335 sigfail.verteiltesysteme.net
If the first query returns an answer and the second returns SERVFAIL, DNSSEC validation is working. Unbound correctly rejects responses with invalid signatures.
Test the Full Stack
# Query through Pi-hole (which should forward to Unbound)
dig @127.0.0.1 example.com

# Verify no third-party resolvers are being used
# In the Unbound logs, you should see queries going to root/TLD/authoritative servers
# NOT to 1.1.1.1 or 8.8.8.8
Performance Expectations
Cold queries (first lookup for a domain) take 50-200ms as Unbound walks the DNS hierarchy. This is noticeably slower than Cloudflare's 10-20ms response time for the same query.
Cached queries resolve in under 1ms. After the first lookup, Unbound serves the answer from its local cache for the duration of the DNS TTL (typically 300-3600 seconds). With prefetching enabled, popular domains stay cached indefinitely.
In practice, you will not notice the difference. Most websites require dozens of DNS lookups, but the initial page load triggers them all, and subsequent requests hit the cache. The handful of cold lookups during a browsing session add maybe 100-200ms total, spread across the entire page load.
If cold query latency bothers you, Unbound's serve-expired setting helps. After the first visit to any domain, Unbound will serve a cached answer even if the TTL has expired, while refreshing the cache in the background. This means you get near-zero latency for any domain you have visited before, with the freshness of a recursive lookup.
Running Unbound Standalone (Without Pi-hole)
If you do not need ad blocking and just want a recursive resolver, Unbound can serve as your network's primary DNS server directly. Change the port mapping to expose port 53:
services:
  unbound:
    ports:
      - "53:53/tcp"
      - "53:53/udp"
Then point your router's DHCP settings to distribute your Unbound server's IP as the network DNS server. Every device on your network will use Unbound for DNS resolution automatically.
For most homelab users, though, the Pi-hole + Unbound combination is the sweet spot: ad blocking, local DNS, DNSSEC validation, and recursive resolution in a simple, maintainable stack.