Running Rootless Containers with Podman in Your Homelab
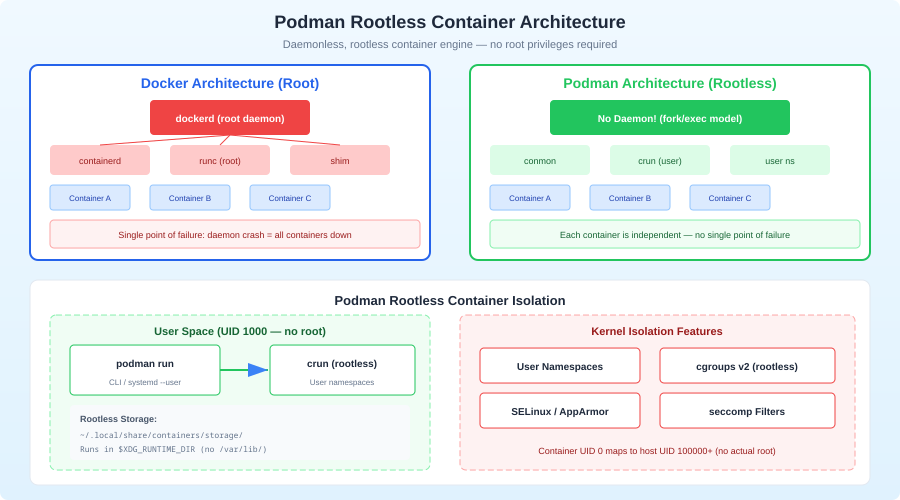
Most homelab guides assume Docker. You install it, add yourself to the docker group, and start running containers as root without thinking twice. It works fine until it doesn't — a container escape, a misconfigured bind mount, or a compromised image that now has root access to your entire host.
Photo by Brett Jordan on Unsplash
Podman's rootless mode flips this model. Your containers run as your regular user, with no privileged daemon in the picture. If a container gets compromised, the attacker has the privileges of your unprivileged user account — not root. For a homelab running on your home network, this matters more than people realize.
This guide covers setting up Podman for rootless container operation from scratch, migrating existing Docker workloads, handling the gotchas you'll hit, and integrating everything with systemd so your containers survive reboots.
Why Rootless Matters for Homelabs
The security argument is obvious, but there are practical reasons too:
- Multi-user homelabs: If multiple people use your server, each user gets their own container environment. No shared daemon, no permission conflicts, no stepping on each other's containers.
- No daemon = no single point of failure: Podman is daemonless. Each container is a regular process. If one crashes, the others keep running. There's no
dockerdto restart. - Systemd-native: Podman generates systemd unit files for your containers. This means your containers are first-class citizens in the init system — proper dependency ordering, logging to journald, restart policies that actually work.
- Identical CLI:
podman runworks exactly likedocker run. Same flags, same image format (OCI). The migration is mostly mechanical.
The trade-off is real though: rootless containers have networking limitations, storage driver quirks, and some services genuinely need root. We'll cover all of that.
Installation
Fedora / RHEL / CentOS Stream
Podman is the default on these distros. It's probably already installed:
sudo dnf install podman
podman --version
Ubuntu / Debian
sudo apt update
sudo apt install podman
On Ubuntu 22.04+, Podman is in the official repos. On older versions, you'll need the Kubic repo:
# Ubuntu 20.04 only
. /etc/os-release
echo "deb https://download.opensuse.org/repositories/devel:/kubic:/libcontainers:/stable/xUbuntu_${VERSION_ID}/ /" | sudo tee /etc/apt/sources.list.d/podman.list
sudo apt update
sudo apt install podman
Arch Linux
sudo pacman -S podman
Post-Install: Verify Rootless Support
Rootless containers need user namespaces (unprivileged). Check that your kernel supports them:
# Should return 1
sysctl kernel.unprivileged_userns_clone
If it returns 0, enable it:
sudo sysctl -w kernel.unprivileged_userns_clone=1
echo "kernel.unprivileged_userns_clone=1" | sudo tee /etc/sysctl.d/99-userns.conf
You also need subuid/subgid ranges for your user. Most distros set this up automatically, but verify:
cat /etc/subuid
cat /etc/subgid
You should see a line like youruser:100000:65536. If it's missing:
sudo usermod --add-subuids 100000-165535 --add-subgids 100000-165535 youruser
Then initialize the user namespace mappings:
podman system migrate
Running Your First Rootless Container
# No sudo, no daemon, just works
podman run -d --name nginx-test -p 8080:80 docker.io/library/nginx:alpine

# Verify it's running as your user
podman ps
ps aux | grep nginx

# Check the container is actually rootless
podman top nginx-test user huser
The podman top output shows user namespace mapping — the process runs as root inside the container but maps to your unprivileged UID on the host. That's the magic of user namespaces.
# Inside container: root (UID 0)
# On host: youruser (UID 1000, mapped through userns)
Want more containers guides? Get guides like this in your inbox — HomeLab Starter delivers one free deep-dive every week.
Networking in Rootless Mode
This is where rootless gets tricky. Without root, you can't bind to ports below 1024 (by default) and you can't create real bridge networks.
Port Binding
Rootless containers use slirp4netns or pasta for networking instead of the host's network stack directly. By default, ports below 1024 are restricted:
# This fails in rootless mode by default
podman run -d -p 80:80 nginx
# Error: rootlessport cannot expose privileged port 80
Two fixes:
Option 1: Use high ports (recommended)
Just map to ports above 1024 and use a reverse proxy:
podman run -d -p 8080:80 nginx
Then use Caddy, Nginx, or Traefik on the host (or in a rootful container) to proxy port 80/443 to your rootless containers.
Option 2: Lower the unprivileged port floor
sudo sysctl -w net.ipv4.ip_unprivileged_port_start=80
echo "net.ipv4.ip_unprivileged_port_start=80" | sudo tee /etc/sysctl.d/99-unprivileged-ports.conf
This lets unprivileged users bind to port 80+. It's a system-wide setting, so consider whether you're comfortable with that.
Container-to-Container Networking
In Docker, you create bridge networks and containers can talk to each other by name. Rootless Podman can do this too, but the implementation is different.
Using Podman pods (recommended):
Pods share a network namespace, so containers in the same pod can talk via localhost:
# Create a pod with port mappings
podman pod create --name my-app -p 8080:80 -p 5432:5432

# Add containers to the pod
podman run -d --pod my-app --name web nginx
podman run -d --pod my-app --name db postgres:16

# The web container can reach postgres at localhost:5432
Using rootless networks (Podman 4.0+):
# Create a network
podman network create my-homelab

# Run containers on it
podman run -d --network my-homelab --name app1 myapp
podman run -d --network my-homelab --name app2 myotherapp

# app2 can reach app1 by name: http://app1:port
With Podman 4.0+, the default network backend is netavark instead of CNI, and rootless DNS resolution between containers works out of the box.
Choosing a Network Mode: pasta vs slirp4netns
Podman 5.0+ defaults to pasta for rootless networking, which is significantly faster than the older slirp4netns:
# Check which one you're using
podman info | grep -i network

# Force pasta (if available)
podman run --network pasta -d nginx

# Force slirp4netns (legacy)
podman run --network slirp4netns -d nginx
pasta provides near-native network performance. If you're on an older Podman, consider upgrading just for this.
Storage and Volumes
Rootless Podman stores container data in your home directory by default:
# Container storage
~/.local/share/containers/storage/

# Volume storage
~/.local/share/containers/storage/volumes/
Bind Mounts and Permissions
This is the most common gotcha with rootless Podman. Because of user namespaces, UID mapping inside the container doesn't match UIDs on the host.
# This often fails with permission errors
podman run -v /home/user/data:/data myapp
The container's root (UID 0) maps to your user's UID on the host, but other UIDs in the container (like UID 33 for www-data) map to subuids that don't own the files.
Fix 1: Use :Z or :z for SELinux relabeling (Fedora/RHEL):
podman run -v /home/user/data:/data:Z myapp
Fix 2: Use --userns=keep-id to map your host UID into the container:
podman run --userns=keep-id -v /home/user/data:/data myapp
This maps your host UID to the same UID inside the container. It's useful when the container process runs as a non-root user with a matching UID.
Fix 3: Set ownership using podman unshare:
# Enter the user namespace
podman unshare chown -R 33:33 /home/user/data
This changes ownership to UID 33 within the user namespace mapping, which means the container's www-data user can access it.
Named Volumes (Easier)
Named volumes avoid most permission headaches:
podman volume create myapp-data
podman run -v myapp-data:/data myapp

# Inspect
podman volume inspect myapp-data
Podman Compose vs Pods
Podman Compose
If you have existing docker-compose.yml files, podman-compose runs them with minimal changes:
pip install podman-compose

# Run your existing compose file
podman-compose up -d
podman-compose ps
podman-compose down
Most docker-compose.yml files work unmodified. Some edge cases:
network_mode: hostworks differently in rootless mode- Named volumes with specific UIDs may need permission fixes
- Health checks work but logging differs slightly
Quadlet: The Modern Approach
Podman 4.4+ introduced Quadlet, which lets you write systemd-native container definitions. Instead of Docker Compose, you write .container files:
# ~/.config/containers/systemd/nginx.container
[Container]
Image=docker.io/library/nginx:alpine
PublishPort=8080:80
Volume=nginx-data.volume:/usr/share/nginx/html:Z

[Service]
Restart=always
TimeoutStartSec=900

[Install]
WantedBy=default.target
# ~/.config/containers/systemd/nginx-data.volume
[Volume]
Then reload and start:
systemctl --user daemon-reload
systemctl --user start nginx
systemctl --user status nginx
Quadlet is the direction Podman is heading. It's cleaner than Compose for long-running services because systemd handles lifecycle, dependencies, and restart logic natively.
Systemd Integration
This is where rootless Podman truly shines. Your containers become proper systemd services.
Generating Unit Files (Legacy Method)
# Generate a systemd unit for an existing container
podman generate systemd --new --name my-container > ~/.config/systemd/user/my-container.service

# Enable and start
systemctl --user daemon-reload
systemctl --user enable --now my-container
The --new flag ensures the service creates a fresh container each time (rather than trying to restart a stopped one).
Enabling Linger
By default, user services stop when you log out. For a homelab server, you want containers running 24/7:
# Enable linger for your user
sudo loginctl enable-linger youruser

# Verify
loginctl show-user youruser | grep Linger
With linger enabled, your --user systemd services start at boot and keep running regardless of login sessions.
Viewing Logs
Container logs flow through journald:
journalctl --user -u my-container -f
This integrates with your existing log infrastructure. If you're running Loki or Promtail, they can scrape journald natively.
Migrating from Docker to Rootless Podman
Step 1: Export Your Docker Compose Stacks
Document what you're running:
# List all Docker containers
docker ps -a --format "table {{.Names}}\t{{.Image}}\t{{.Ports}}"

# Export compose files
ls ~/docker-compose/
Step 2: Test with Podman Compose First
cd ~/my-stack
podman-compose up -d
If it works, great. If not, debug the permission and networking issues (covered above) one at a time.
Step 3: Convert to Quadlet for Production
Once things work with podman-compose, convert to Quadlet files for each service. This gives you better systemd integration and eliminates the compose layer.
Step 4: Migrate Volumes
# Copy data from Docker volumes to Podman volumes
docker volume inspect mydata | jq -r '.[0].Mountpoint'
# /var/lib/docker/volumes/mydata/_data

podman volume create mydata
cp -a /var/lib/docker/volumes/mydata/_data/* $(podman volume inspect mydata --format '{{.Mountpoint}}')/
Step 5: Set Up Monitoring
Make sure your monitoring still works. Podman exposes a socket API compatible with Docker tools:
# Enable the Podman socket for your user
systemctl --user enable --now podman.socket

# It's at this path
echo $XDG_RUNTIME_DIR/podman/podman.sock
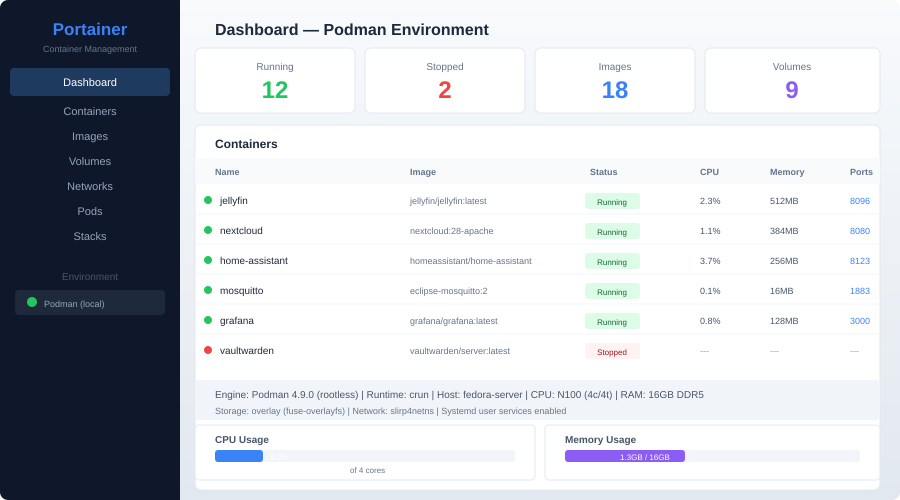
Tools like Portainer, Yacht, and Watchtower can connect to this socket. Set the DOCKER_HOST environment variable:
export DOCKER_HOST=unix://$XDG_RUNTIME_DIR/podman/podman.sock
Real-World Homelab Stack: Rootless Podman
Here's a practical example — running a monitoring stack entirely rootless:
# ~/.config/containers/systemd/prometheus.container
[Container]
Image=docker.io/prom/prometheus:latest
PublishPort=9090:9090
Volume=%h/prometheus/config:/etc/prometheus:Z
Volume=prometheus-data.volume:/prometheus:Z

[Service]
Restart=always

[Install]
WantedBy=default.target
# ~/.config/containers/systemd/grafana.container
[Container]
Image=docker.io/grafana/grafana:latest
PublishPort=3000:3000
Volume=grafana-data.volume:/var/lib/grafana:Z
Environment=GF_SECURITY_ADMIN_PASSWORD=changeme

[Service]
Restart=always

[Install]
WantedBy=default.target
# ~/.config/containers/systemd/prometheus-data.volume
[Volume]

# ~/.config/containers/systemd/grafana-data.volume
[Volume]
systemctl --user daemon-reload
systemctl --user enable --now prometheus grafana
Both services run as your user, log to journald, restart automatically, and start at boot (with linger enabled).
When to Stay Rootful
Rootless isn't always the answer. Some workloads genuinely need root:
- Network services on privileged ports (DNS on 53, DHCP on 67/68) — unless you lower the unprivileged port floor
- Containers that need raw network access (Pi-hole, network scanners, DHCP servers)
- NFS mounts inside containers — rootless can't mount NFS
- Containers requiring specific kernel capabilities that can't be granted to unprivileged users
- High-performance workloads where the slirp4netns/pasta overhead matters (though pasta closes this gap significantly)
For these cases, you can run a mix: most services rootless, a few specific containers rootful with sudo podman run.
Troubleshooting Common Issues
"Error: cannot setup namespace"
Your subuid/subgid mappings are missing or wrong:
sudo usermod --add-subuids 100000-165535 --add-subgids 100000-165535 $USER
podman system migrate
"Permission denied" on bind mounts
Use --userns=keep-id or fix ownership with podman unshare:
podman unshare chown -R 1000:1000 /path/to/data
Containers stop when you log out
Enable linger:
sudo loginctl enable-linger $USER
Slow DNS resolution in containers
Rootless networking can sometimes have DNS issues. Set a custom DNS:
podman run --dns 1.1.1.1 myimage
Or configure it globally in ~/.config/containers/containers.conf:
[containers]
dns_servers = ["1.1.1.1", "8.8.8.8"]
Image pull errors
Rootless Podman uses different registries config. Make sure you have docker.io configured:
# ~/.config/containers/registries.conf
unqualified-search-registries = ["docker.io"]
Automatic Updates
Podman has built-in auto-update support. Label your containers:
podman run -d --label io.containers.autoupdate=registry --name myapp myimage
Then set up a systemd timer:
systemctl --user enable --now podman-auto-update.timer
This checks for new images and restarts containers when updates are available. Combined with Quadlet, it's a hands-off update system.
Wrapping Up
Rootless Podman is production-ready for homelabs. The initial setup has more friction than Docker — you'll fight with permissions, port numbers, and user namespaces for an afternoon. But once it's working, you get better security, no daemon dependency, and native systemd integration.
Start by converting one or two services. Get comfortable with the Quadlet workflow. Then migrate the rest gradually. Keep a few rootful containers for the edge cases that genuinely need them.
The tooling is mature, the performance is there (especially with pasta networking), and Red Hat's investment means it's not going anywhere. For a homelab in 2026, rootless Podman is the better default.